Optimize the LCP Resource Load Duration
From download to display: learn how to improve the resource load duration part of the Largest Contentful Paint

This guide is part of the Largest Contentful Paint (LCP) section of our Core Web Vitals resource center. Resource Load Duration is the third of four sequential LCP phases, measuring the time it takes to download the LCP resource over the network. While Resource Load Delay often accounts for a larger share of LCP time, optimizing download duration remains essential for achieving a good LCP score.
Optimize the LCP Resource Load Duration
Largest Contentful Paint (LCP) is one of the three Core Web Vitals performance metrics that measure your online user experience. The LCP captures the time it takes for the largest contentful element (an image, video, or text block) to become visible in the viewport. The Resource Load Duration is a sub-part of the LCP that indicates how much time is spent fetching the network resource for the LCP element.
Table of Contents!
What is Resource Load Duration in LCP?
Resource Load Duration, often called Load Duration, refers to the time required for the browser to download the network resource (e.g., an image) that will eventually become the LCP element. For images and videos, this duration spans from when the image starts downloading to when the browser completes the download. For text-based LCP elements, the load duration is typically zero. Google's LCP optimization guide breaks LCP into four sequential sub-parts, with Resource Load Duration being the time spent actually downloading the resource bytes.

Resource Load Duration is measured from the moment the browser starts downloading the LCP resource until it has finished downloading. Four main factors determine resource load duration:
- File Size: Larger files require longer download times.
- Network Speed: Slower connections naturally extend load duration.
- Server Responsiveness: Delays in server response slow down resource fetching.
- Concurrent Downloads: Resources downloaded simultaneously compete for bandwidth, which can increase load times.
How to Detect Resource Load Duration
There are two effective ways to identify and measure resource load duration:
Network Inspection in Chrome DevTools: Use the Ctrl + Shift + I shortcut to open Chrome's Developer Tools, then select the "Network" tab and reload the page. Look up the LCP element in the network requests (if you want to know the LCP element, try the Core Web Vitals Visualizer). The network inspector will show you how long it took to download the resource.

Pro Tip: Enable large request rows to see additional details such as LCP latency, transferred size, and actual size.
Use Real User Monitoring (RUM) Data:
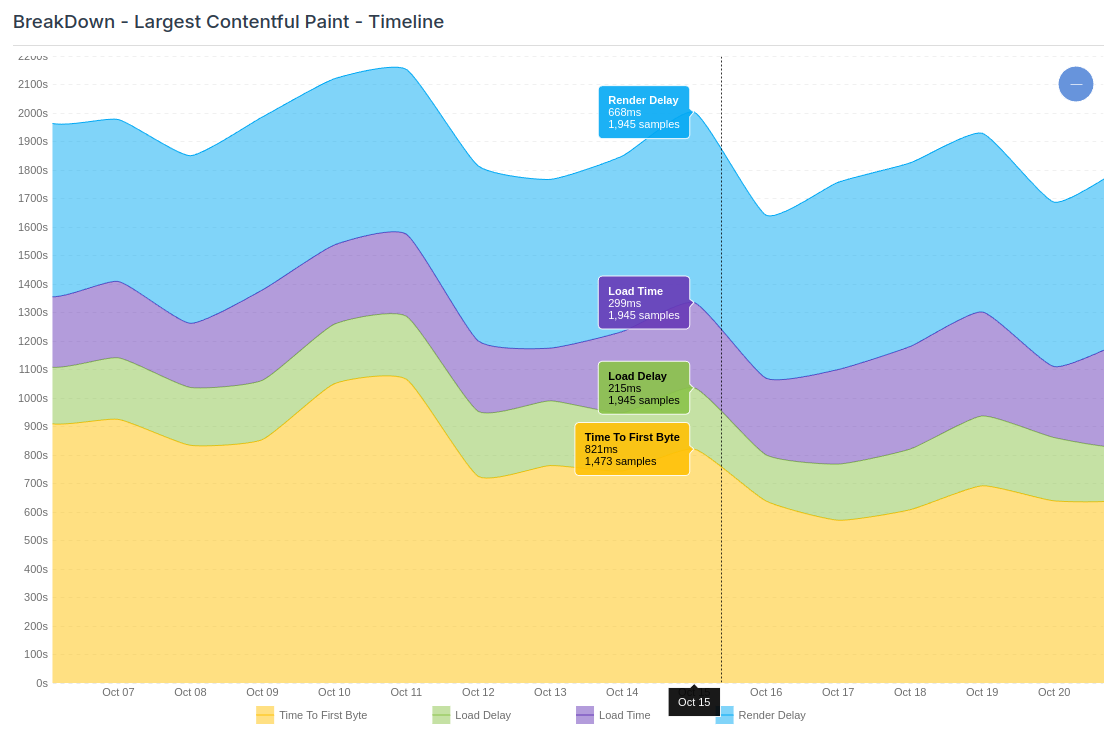
RUM tools often log LCP attribution data. Attribution data for the Largest Contentful Paint contains information about the resource load duration. With this data, you can chart load duration trends over time or by page and spot the pages or elements that slow things down.
How to Improve LCP Load Duration
Resource load duration problems happen when resources are too large or delivered over suboptimal network paths. Two main approaches address this: reducing data size or optimizing data delivery.
1. Optimize File Size
Optimizing file size reduces the number of bytes to be sent over the network. Less data means less download time. For a full guide to image optimization, see our article on how to optimize images.
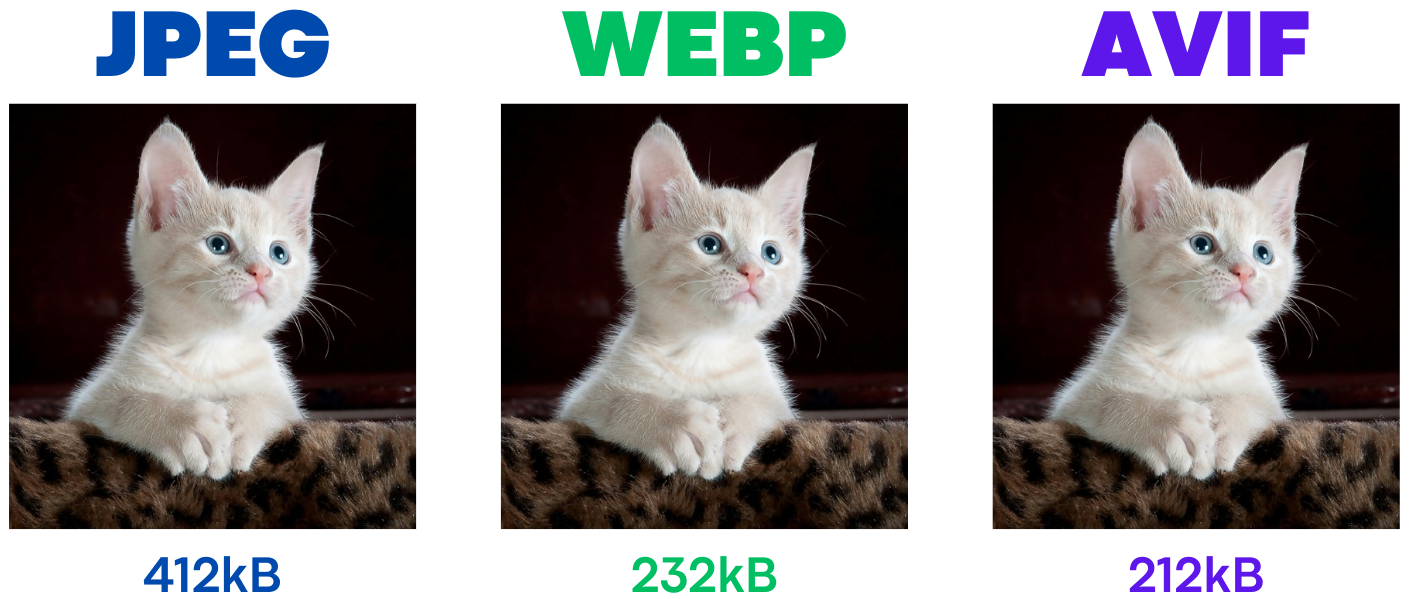
Use Modern Image Formats
AVIF and WebP are the best options for image compression. AVIF compresses up to 50% smaller than WebP for complex photos, with no visible quality loss. WebP has wider browser support and works well for simpler images. According to the 2025 Web Almanac, WebP is now used on over 40% of image requests, while AVIF adoption has roughly doubled year over year but still sits below 10%.
Choosing the Right Quality Setting
Modern image formats like WebP and AVIF allow significant quality reduction before visual degradation becomes noticeable. As a general rule, a quality setting between 75 and 85 for WebP, and between 60 and 75 for AVIF, will look identical to the original at normal viewing distances but at a fraction of the file size. Always test with your specific images, as the optimal quality depends on the content type (photographs vs. illustrations vs. text-heavy images).
Automating Image Compression with Sharp
For build-time image optimization, the sharp library is one of the fastest and most widely used tools in the Node.js ecosystem. The following example shows how to convert and compress an image into both WebP and AVIF formats with optimized quality settings:
const sharp = require('sharp');

// Convert to WebP with optimized quality
await sharp('input.jpg')
  .resize(1200)  // Resize to maximum needed width
  .webp({ quality: 80, effort: 6 })
  .toFile('output.webp');

// Convert to AVIF with optimized quality
await sharp('input.jpg')
  .resize(1200)
  .avif({ quality: 65, effort: 6 })
  .toFile('output.avif');

// Generate multiple sizes for responsive images
const widths = [400, 800, 1200];
for (const width of widths) {
  await sharp('input.jpg')
    .resize(width)
    .webp({ quality: 80 })
    .toFile(`output-${width}w.webp`);
}
This approach generates all the variants you need for a responsive <picture> element with modern format support. For WordPress sites, plugins like ShortPixel or Imagify handle this conversion automatically on upload.
Responsive Images
The <picture> element and srcset attribute serve different image sizes based on the screen: smaller versions for mobile, higher resolution for larger screens. Here's an example setup:
<picture>
  <source media="(min-width: 800px)" srcset="large.jpg 1x, larger.jpg 2x">
  <img src="photo.jpg" alt="Description" width="800" height="450">
</picture>
Correct Image Dimensions
Responsive images are only part of the solution because responsive does not mean they are right-sized. Matching image dimensions to their display size is one of the most common mistakes I see. Serving a 2000px wide image for a 500px display area wastes bandwidth and can noticeably slow down load times.
Font File Optimization
When the LCP element is text rendered with a custom web font, the font file becomes the LCP resource. Optimize font load duration by:
- Use WOFF2 format: WOFF2 provides the best compression for web fonts, typically 30% smaller than WOFF and significantly smaller than TTF or OTF files.
- Subset your fonts: If your site only uses Latin characters, subset the font to remove unused character sets (Cyrillic, Greek, CJK). Tools like
glyphhangerorpyftsubsetcan automate this, often reducing font file size by 50% or more. - Limit font variations: Each weight and style (regular, bold, italic) is a separate file download. Only include the weights your design actually uses.
2. Improve Network Performance
Once resource sizes are optimized, the next step is maximizing network speed, or even bypassing the network altogether.
Bypass Network Needs with Browser Caching
There is no faster network connection than a skipped network connection. Browsers can serve static content (images, scripts, stylesheets) directly from the local cache. Configure the server to send correct caching instructions to the browser.
The most effective setup is to send a Cache-Control header like this:
Cache-Control: public, max-age=31536000, immutable
- public: Allows the resource to be cached by both browsers and intermediary caches.
- max-age=31536000: Sets the maximum time the resource is considered fresh to one year (31,536,000 seconds).
- immutable: Indicates that the resource will not change over time, preventing unnecessary revalidation requests.
For this strategy to work safely, use content-hashed filenames (e.g., hero-abc123.webp) so that when the image changes, the filename changes too, busting the cache automatically.
Brotli vs. Gzip Compression
For text-based resources (HTML, CSS, JavaScript, SVG), server-side compression is essential. Brotli, developed by Google, consistently outperforms Gzip in compression ratio while maintaining comparable decompression speeds. The following comparison illustrates the difference:
| Feature | Gzip | Brotli |
|---|---|---|
| Typical size reduction | 60-70% | 70-80% |
| Compression speed | Faster | Slower (at high levels) |
| Decompression speed | Fast | Comparable to Gzip |
| Browser support | Universal | 97%+ (all modern browsers) |
| Best for | Dynamic content, real-time compression | Static assets, pre-compressed files |
| Requires HTTPS | No | Yes |
The ideal setup is to pre-compress static assets with Brotli at a high compression level (e.g., level 11) during your build process, and use Gzip as a fallback for clients that don't support Brotli. Most CDNs, including Cloudflare, handle this automatically. For more details on CDN configuration, see our guide on configuring Cloudflare for performance.
HTTP/2 and HTTP/3: Modern Protocol Benefits
The delivery protocol matters most when the browser downloads multiple resources at the same time.
- HTTP/2 introduced multiplexing, allowing multiple requests and responses to be sent simultaneously over a single TCP connection. This eliminates the head-of-line blocking problem of HTTP/1.1, where one slow resource could delay all others. HTTP/2 also supports header compression (HPACK) and server push.
- HTTP/3 takes this further by replacing TCP with QUIC, a UDP-based protocol. HTTP/3 eliminates TCP-level head-of-line blocking (where a single lost packet stalls all streams), provides faster connection establishment through 0-RTT (Zero Round Trip Time resumption for returning visitors), and handles packet loss more gracefully. These improvements primarily speed up the Time to First Byte, but they also reduce resource load duration.
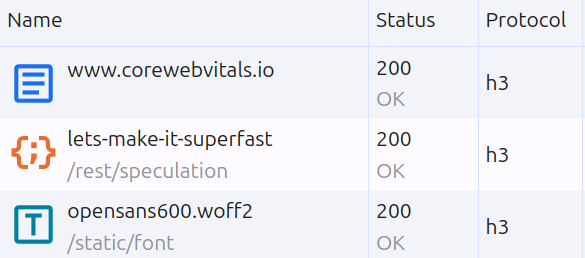
To check if HTTP/3 is enabled, simply inspect your network with the Ctrl+Shift+I shortcut. Select the network tab, right-click the network column headers, and make sure 'protocol' is enabled. Reload the page and check the protocol. For HTTP/3, the protocol should read 'h3'.
Content Delivery Networks (CDN)
A CDN is a network of distributed servers that cache and serve static resources like images, CSS, and JavaScript from locations closer to the user. This reduces the data travel time (the round-trip time), which directly affects the Resource Load Duration.
Beyond proximity, modern CDNs offer several performance advantages that reduce load duration:
- Automatic image optimization: Many CDNs can compress, resize, and convert images on the fly. For example, Cloudflare Polish, Imgix, and Cloudinary can serve WebP or AVIF automatically based on the browser's Accept header.
- Edge caching: Static resources are cached at edge nodes worldwide, eliminating the need to fetch from the origin server entirely.
- Protocol optimization: CDNs typically enable HTTP/2 and HTTP/3 by default, along with Brotli compression, without requiring server-side configuration changes.
- Connection reuse: Since the CDN serves all resources from a single domain, the browser reuses a single connection, eliminating the overhead of multiple DNS lookups and TLS handshakes.
Specialized Image CDNs can take this further by providing automatic, real-time optimizations like format conversion, resizing, and compression.
Self-Hosting Resources
Important and early network resources should by default always be hosted on the origin server. Self-hosting sidesteps the need to connect to third-party servers, which can cause considerable delays due to additional DNS lookups, SSL negotiations, and connection setups. Self-hosting ensures the reuse of a single, already open connection and reduces the overhead of establishing separate connections. Self-hosted resources also enable full control over compression and cache policies.
3. Optimize Resource Prioritization
After trimming resource size and optimizing the network, there is also the issue of network competition. When the browser requests multiple resources at the same time on a slow connection, they compete for bandwidth. Minimize that competition by scheduling resource downloads.
Prioritize Critical Resources
Flag essential resources, like hero images or above-the-fold CSS, with fetchpriority="high". This signals the browser to download these assets first, keeping them from getting bogged down by scripts, widgets, or third-party elements that don't need instant loading. Prioritizing these critical resources reduces load time for the content your users care about most. The combination of preload (to solve for late discovery) and fetchpriority="high" (to solve for network contention) is the most powerful technique for ensuring the LCP resource is fetched as early and as quickly as possible.
<!-- For LCP images visible in the initial HTML -->
<img src="hero-image.webp" fetchpriority="high" alt="...">
<!-- To improve discovery  -->
<link rel="preload" href="hero-image.webp" as="image" fetchpriority="high">
Reduce Network Contention
Streamline initial downloads by deferring or lazy-loading non-essential assets. Postpone loading for any images or videos not immediately visible, as well as background or secondary elements. Using loading="lazy" for offscreen media is a good place to start, while further deferring other non-essential scripts and assets will free up bandwidth and cut down on any competition with your critical resources, keeping your page's main content quick to load and display. Never apply loading="lazy" to your LCP image; this is a critical anti-pattern that will harm your score.
4. Set Up Speculation Rules
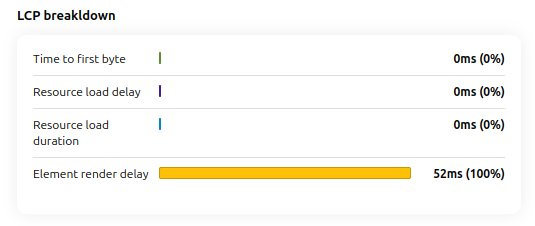
Speculation Rules enables browsers to prefetch or prerender web pages based on predicted user navigation. Prefetching effectively eliminates the Time to First Byte sub-part of the LCP and has no impact on the resource load duration. Prerendering renders the next page in a hidden tab and downloads all the page resources. This eliminates most of the load durations for the LCP element as shown in this example LCP breakdown of a prerendered page.
Next Steps: Continue Optimizing LCP
Resource Load Duration is just one of the four LCP phases. After optimizing download time, continue with the other LCP phases:
- Fix & Identify LCP Issues: The complete diagnostic methodology for finding and fixing all LCP problems using field data and lab tools.
- Optimize the LCP Image: Image format selection, responsive images, preloading, and common image optimization mistakes.
- Resource Load Delay: Ensure the browser discovers the LCP resource as early as possible. This is often a larger bottleneck than load duration itself.
- Element Render Delay: After the resource downloads, ensure the browser can paint it immediately by clearing the main thread.
Performance degrades the moment you stop watching.
I set up the monitoring, the budgets, and the processes. That is the difference between a fix and a solution.
Let's talk
